Have you ever wondered if a simple tool choice could be the difference between a quick, successful repair and a frustrating afternoon? Many homeowners face this exact dilemma when their mower needs a tune-up.
Getting the right tool for the job is the first step to a smooth maintenance experience. This is especially true when dealing with the engine’s heart.
Using the correct socket ensures you can remove and install the component without causing damage. It protects the delicate threads and gives you a secure grip. This guide will clarify the exact tool you need.
We will walk you through identifying the proper fit for your machine. You will learn how to complete the entire replacement process with confidence. This knowledge turns a potentially tricky task into a straightforward project.
Whether you are performing routine seasonal care or troubleshooting a starting issue, this fundamental information is essential. By the end, you will understand the requirements for your specific equipment and how to achieve optimal results.
Key Takeaways
- Most lawn mower engines require one of two common socket sizes for spark plug maintenance.
- Using the correct tool is critical to avoid damaging the engine or the plug itself.
- The spark plug is a vital component that ignites the fuel to power your mower.
- Proper tool selection makes the removal and installation process safer and more efficient.
- This task is generally considered beginner-friendly and can be completed in under 30 minutes.
- Knowing your mower’s specific requirements is fundamental knowledge for every owner.
Introduction to Lawn Mower Spark Plug Maintenance
The small component that ignites your engine’s fuel mixture plays an outsized role in your equipment’s operation. This vital part creates the electrical charge needed for combustion. Regular attention ensures your machine runs smoothly throughout the mowing season.
Why Spark Plug Maintenance Matters
Your engine’s performance depends heavily on a strong, consistent electrical charge. The component that provides this spark gradually wears down from heat and carbon buildup. When it deteriorates, you may experience hard starting or reduced power.
Neglecting this essential maintenance can lead to more serious engine troubles. Regular inspection and replacement keep your equipment running efficiently. This simple care prevents costly repairs down the road.
When to Replace Your Spark Plug
Most manufacturers recommend changing this component after 25-50 hours of operation. Many experts suggest seasonal replacement at the start of each mowing period. According to Marcus Garner, extension agent at Alabama A&M University, “you should swap out the spark plug once per season or every 50 to 100 hours of use.”
Watch for signs like difficult starting or rough operation. These indicate your ignition element needs attention before the scheduled maintenance interval. Incorporating this task into your seasonal routine ensures reliable performance.
Tools and Materials Required for Changing Your Spark Plug
Proper preparation is the key to a successful and frustration-free maintenance task. Gathering the right equipment before you start ensures a smooth process from beginning to end.

Having the correct gear protects your engine and the delicate component you are replacing. It also makes the job quicker and safer. Let’s review the essential items you will need.
Selecting the Right Replacement Spark Plug
Your first step is to acquire the correct new spark plug. The wrong type can lead to poor performance or even engine damage.
Always consult your owner manual for the exact part number and specifications. If the manual is unavailable, carefully remove the old plug and take it to a store for an exact match. This guarantees compatibility.
Choosing the Correct Socket and Wrench
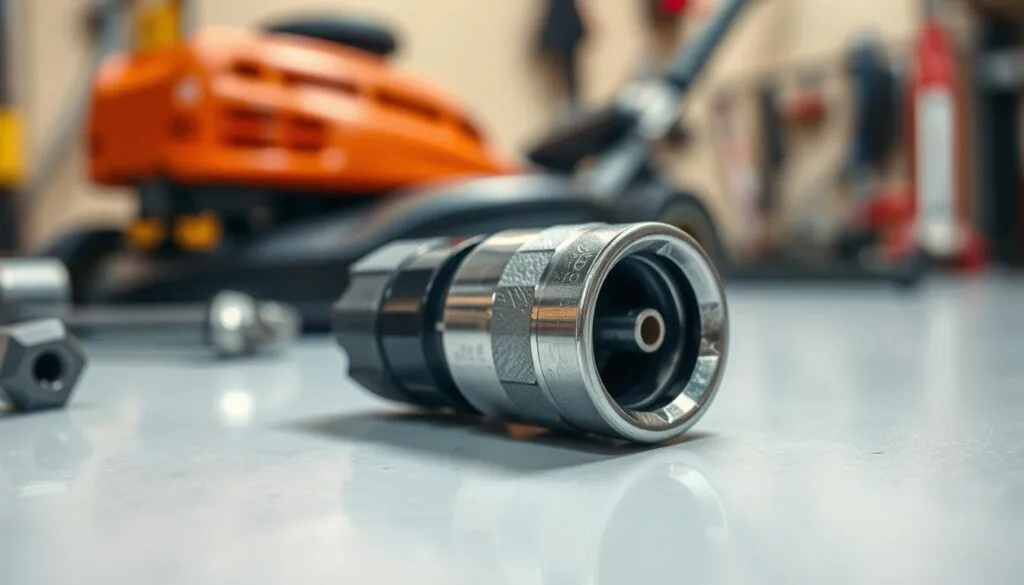
The most critical tool for this job is a dedicated spark plug socket. This is a deep socket with a rubber insert inside.
The insert grips the ceramic part of the spark plug, preventing cracks during installation or removal. Most engines require either a 13/16-inch or 5/8-inch size.
You will also need a socket wrench or ratchet to turn the socket. An adjustable wrench can work in a pinch. A spark plug gap gauge is vital for setting the electrode distance on your new spark plug.
Other helpful tools include a wire brush for cleaning, needle-nose pliers, and a small amount of engine oil for lubricating the threads. With these items, you are fully prepared.
What size socket for a lawn mower spark plug: Selecting the Right Tool
Choosing the correct tool dimension ensures a smooth and damage-free maintenance process. The right fit prevents stripping and protects delicate components.
Proper tool selection is fundamental to successful equipment care. It transforms a potentially frustrating task into a straightforward project.
Understanding Standard Socket Sizes for Lawn Mowers
Most outdoor power equipment uses one of two common measurements. The 13/16-inch option fits many modern residential machines. Smaller engines often require the ⅝-inch dimension instead.
Specialized sockets feature internal rubber inserts. These grips protect ceramic parts during installation. Deep design accommodates the full component length.
Ensuring Compatibility with Your Mower Model
Always consult your equipment manual first. This document specifies the exact requirements for your specific model. It provides the most reliable guidance.
If documentation is unavailable, inspect the existing component carefully. Test different options to find the perfect fit. A complete socket set offers valuable versatility for various equipment types.
Using improper tools risks damage to both the component and your engine. Correct selection ensures safe, efficient maintenance every time.
Step-by-Step Spark Plug Replacement Process
Begin your maintenance by locating the component that delivers the electrical charge to your engine. This part is typically found on the side or front of push mower engines. Riding models often position it on the engine block beneath the hood.

Some riding equipment requires attention to two ignition elements. Always identify all components before starting work.
Locating and Disconnecting the Old Spark Plug
First, disconnect the thick rubber wire attached to the top of the element. Grasp the boot firmly and pull straight off. If resistant, gently twist while pulling to avoid damage.
This crucial safety step prevents accidental engine starting during your work. Always complete this before any other action.
Safely Removing the Spark Plug
Clean the surrounding area thoroughly with a brush or rag. This prevents debris from entering the engine cylinder when you remove the part.
Fit your socket snugly onto the hex nut and turn counterclockwise to loosen. Once loose, finish unscrewing by hand. Handle the old component carefully to avoid dropping it.
Installing the New Spark Plug
Thread the replacement element into the opening by hand first. This prevents cross-threading that can damage engine threads.
After hand-tightening, use your socket to turn it about a quarter to half turn more. Avoid over-tightening to prevent damage to delicate parts.
Push the wire boot firmly onto the new component until you hear a click. Gently tug to verify secure attachment before testing your equipment.
Adjusting the Spark Plug Gap and Installation Techniques
The small space between electrodes determines how effectively your ignition system functions. This critical measurement affects combustion quality and engine reliability.
Proper attention to this detail ensures optimal performance from your equipment. It transforms a simple replacement into precision maintenance.
How to Check and Adjust the Spark Plug Gap
Consult your owner’s manual for the exact specification required. Most equipment requires a measurement between 0.02 and 0.03 inches.
Use a gap gauge to measure the distance between electrodes. The tool should slide through with slight resistance for proper fit.
If adjustment is needed, bend the ground electrode carefully. Make small changes and recheck frequently to avoid damage.
Proper Tightening to Avoid Future Issues
Begin installation by threading the component by hand. This prevents cross-threading that can damage engine components.
After hand-tightening, use your wrench for a final quarter to half turn. Avoid over-tightening to prevent stripped threads or cracked insulators.
Under-tightening can cause vibration issues during operation. Proper torque ensures secure installation without damage.
Safety Considerations and Troubleshooting Common Issues
Proper safety protocols protect both you and your equipment during essential maintenance procedures. Understanding potential hazards ensures your work remains accident-free and productive.
Diagnostic insights from component inspection reveal valuable information about engine health. This knowledge helps you address problems before they become serious.
Mower Safety Tips Before and During Maintenance
Always make sure your equipment is turned off and completely cooled before beginning work. Hot surfaces can cause serious burns. Wait at least 15-20 minutes after use.
Disconnect the ignition wire to prevent accidental starting. Work in a well-ventilated area away from ignition sources. Gasoline vapors are highly flammable.
Remove the key from riding models. This extra precaution ensures safety during your maintenance time.
Identifying and Resolving Common Spark Plug Issues
If your engine won’t start, check the wire connection first. Verify it clicks securely onto the new component. Also confirm the gap setting matches your owner manual specifications.
Rough operation may indicate improper tightening or incorrect type. A black, sooty appearance suggests fuel mixture problems. Clean or replace your air filter to address this issue.
White deposits signal overheating. Check cooling fins for debris and verify oil levels. Oily coating warns of potential internal engine concerns requiring professional attention.
Conclusion
You now possess the fundamental knowledge to confidently handle this essential engine maintenance task. Understanding the correct tool requirements empowers you to keep your equipment running smoothly.
This straightforward procedure typically takes 15 to 30 minutes. It is an accessible project for most homeowners. Regular attention prevents frustrating starting issues and ensures reliable operation.
Investing in a quality socket set provides versatility for maintaining various equipment. This simple care is one part of a complete maintenance routine. It includes oil changes and air filter cleaning.
If you ever feel unsure, consult a professional mechanic. By the end of this guide, you can tackle this job with the right tools and technique. Your lawn will thank you for the reliable performance.
FAQ
What is the most common socket size needed for a spark plug?
The most common size is a 5/8-inch spark plug socket. This fits the majority of Briggs & Stratton, Honda, and Kohler engines. Always verify this with your owner manual for your specific model.
Can I use a regular deep socket instead of a spark plug wrench?
It’s not recommended. A dedicated spark plug wrench has a rubber insert that securely grips the ceramic part of the plug, preventing damage during removal and installation. A standard deep socket lacks this protective feature.
How often should I change the spark plug on my lawn mower?
For optimal performance, you should replace your spark plug once per mowing season, or about every 25 hours of operation. If your engine is hard to start or runs roughly, it might be time for a new spark plug.
What other tools do I need besides the socket?
You will need a ratchet or a wrench to turn the socket. A spark plug gap tool is also essential for checking and adjusting the gap on the new plug before you install it. A clean cloth is helpful for wiping away debris.
What should I do if the spark plug is stuck?
First, ensure you are turning it counterclockwise to loosen it. If it’s seized, apply a small amount of penetrating oil around the base and let it sit for 10-15 minutes. Use steady pressure to avoid breaking the plug. Forcing it can damage the engine threads.
How tight should I install the new spark plug?
Hand-tighten the plug until it seats, then use the wrench to give it about a quarter to a half turn more. Overtightening can damage the threads, while undertightening can lead to poor compression and overheating. Refer to the torque specifications in your owner manual if available.