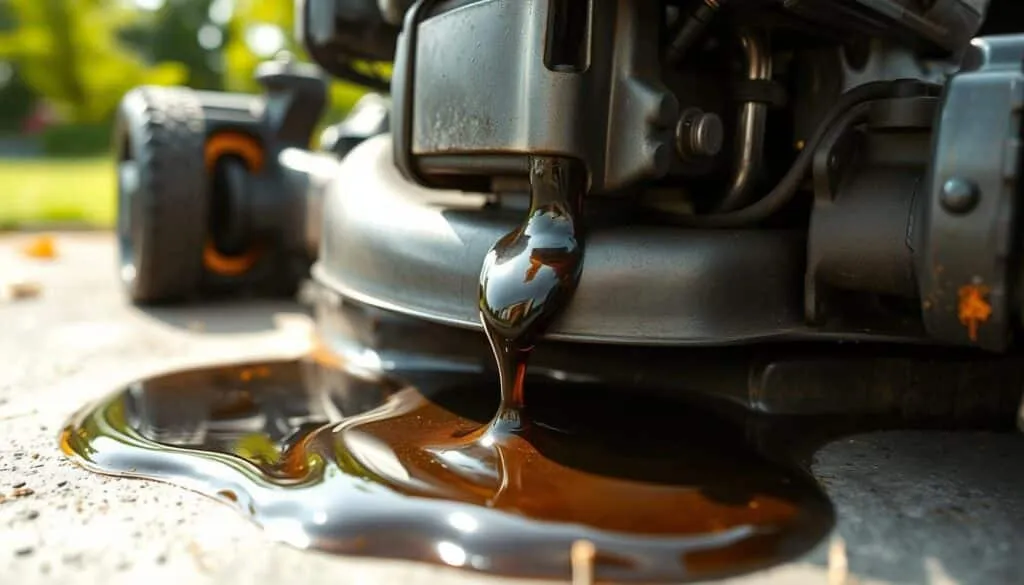
Have you ever noticed dark stains on your garage floor after using your equipment? That mysterious puddle might be telling you something important about your machine’s health.
Discovering fluid where it shouldn’t be can be frustrating. Many equipment owners encounter this issue but don’t realize how serious it can become. Understanding what’s happening inside your machine helps you take the right action.
Common culprits include worn gaskets, loose seals, or an overfilled reservoir. These components work hard to keep lubricant contained. When they fail, you’ll see evidence on the ground beneath your equipment.
This guide walks you through identifying the source of the problem. You’ll learn which issues you can handle yourself and when to seek professional help. Addressing leaks early prevents more serious engine damage down the line.
By the end, you’ll have a clear action plan for diagnosis and repair. This knowledge saves you time and money on maintenance while keeping your equipment running smoothly.
Key Takeaways
- Early detection of fluid leaks prevents costly engine repairs
- Worn gaskets and seals are the most frequent causes
- Overfilled reservoirs can create pressure-related issues
- Proper diagnosis helps determine DIY fixes versus professional help
- Regular maintenance extends your equipment’s lifespan
- Understanding your machine’s lubrication system aids troubleshooting
- Quick action preserves your equipment’s performance and value
Understanding the Problem
That unexpected puddle under your machine tells a story about its condition. Identifying fluid escape early prevents more serious mechanical failures down the road.
Recognizing Signs of Oil Leaks
Visible clues help you spot trouble before it escalates. Look for dark puddles forming beneath your equipment after use. Streaks along the deck surface or accumulation near drainage holes also indicate issues.
Your machine may exhibit secondary symptoms during operation. Spitting oil suggests loose internal components requiring immediate attention. Smoke signals lubricant dripping onto heated parts like the muffler.
Potential Risks and Engine Damage
Ignoring early warnings can lead to serious consequences. Consistent fluid loss affects proper lubrication critical for engine function. This creates overheating and increased friction between moving parts.
What begins as a minor issue can escalate into complete engine seizure. Addressing leaks promptly preserves your equipment’s performance and value. Quick action also eliminates safety hazards from slippery surfaces.
Common Causes Behind “why is my lawn mower leaking oil”
Your equipment’s lubrication system contains several potential failure points. Identifying these common issues helps you pinpoint the source of trouble quickly.
Worn Gaskets, Loose Seals, and Overfilled Oil
Cracked or deteriorated gaskets represent the most frequent source of lubricant escape. The crankcase and valve cover gaskets harden over time from heat exposure.
These rubber components eventually develop cracks that allow fluid to seep through. Regular inspection helps catch deterioration before major leaks develop.
Overfilling the reservoir creates internal pressure that forces lubricant past seals. Always check the indicator markings to maintain the proper oil level.

Drain Plug and Tipped Mower Issues
A loose or damaged drain plug frequently causes bottom leaks. Older equipment may have stripped threads or cracked washers around this component.
Improper tipping during maintenance can drain lubricant into unwanted areas. Positioning the air filter downward may cause temporary smoking and leakage.
Seals around moving parts like the crankshaft gradually lose effectiveness. Cracks in the oil fill tube also contribute to gradual fluid loss over time.
Key Components to Inspect
Systematic examination of specific parts reveals the true source of your equipment’s fluid loss. Focus your attention on these critical areas where problems commonly develop.
Air Filter, Oil Fill Seal, and Oil Fill Tube
Begin with the air filter inspection. A clogged filter creates internal pressure that forces lubricant through seals. Test airflow by removing the component and blowing through it.
Check the oil fill seal where you add fresh lubricant. Ensure it’s properly fastened and shows no deterioration. The tube itself can develop cracks over time.
Identify tube damage by wiping away residue, running the equipment briefly, then checking for fresh fluid. This simple test confirms whether the oil fill system needs replacement.
Valve Gaskets and Bearing Ring Seals
Examine the valve gasket sealing the chamber and cover. Look for accumulated residue on the exterior surface. This indicates seal failure requiring attention.
Your equipment’s crankshaft runs through a bearing with upper and lower rings. Either seal can wear out or become loose. The lower bearing ring seal frequently causes fluid escape when compromised.
Handle these components carefully during inspection. Attempting removal without proper tools can damage the seals or surrounding parts. The crankcase gasket connecting case halves also deserves close examination.
DIY Troubleshooting and Repair Steps
Taking control of your equipment’s maintenance starts with a logical troubleshooting sequence. This approach helps you identify simple fixes before considering complex repairs.
Many common issues can be resolved with basic tools and a methodical inspection. Following these steps saves time and money.

Step-by-Step Component Checks
Begin by ensuring the correct oil level. Use the dipstick to verify the fluid is not above the full mark. An overfilled reservoir creates pressure that forces lubricant past seals.
Next, examine the air filter. A clogged filter restricts airflow, leading to internal pressure issues. Test it by removing the component and checking if air flows through easily.
Inspect the drain plug for tightness and damage. Also, check gaskets by wiping them clean, running the engine briefly, and looking for fresh fluid seepage.
Effective Fixes and Maintenance Tips
If you’ve tipped the machine, oil may enter the cylinder. In this case, remove the spark plug to drain excess fluid. Clean the area and let any residue burn off during operation.
Replace a dirty air filter or a worn spark plug. Cleaning components with a degreaser can often solve the issue. These simple actions fix lawn equipment problems effectively.
For persistent issues after these checks, professional assessment is recommended. The table below outlines common tasks.
| DIY Task | Professional Task | Expected Outcome |
|---|---|---|
| Check oil level and adjust | Replacing internal piston rings | Prevents pressure-related leaks |
| Clean replace the air filter | Sealing a cracked engine block | Restores proper airflow and pressure |
| Inspect and tighten drain plug | Major gasket replacement | Stops fluid loss from the base |
Addressing Specific Concerns
When your machine begins emitting visible smoke during operation, it’s communicating internal problems. These symptoms often point to specific issues that require targeted solutions.
Exhaust Leaks and Smoking Issues
Smoke from the exhaust area typically indicates lubricant reaching hot components. The muffler becomes extremely hot during operation, burning any fluid that drips onto it.
This smoking problem can result from several causes. Overfilled reservoirs create pressure that forces lubricant into the exhaust system. Blocked air filters also contribute to this pressure buildup.
Worn internal components like piston rings allow fluid to enter the combustion chamber. When this happens, you’ll notice blue or gray smoke during operation. The equipment may also spit lubricant from the exhaust area.
Improper storage methods frequently cause temporary smoking issues. If you’ve tipped the machine recently, residual fluid in the cylinder will burn off after startup.
When to Consider Professional Help
After completing all basic troubleshooting, persistent problems signal deeper issues. Continued smoking despite proper fluid levels suggests internal component wear.
Seek professional assistance when you suspect piston ring or cylinder damage. These repairs require specialized tools and expertise. Mechanics can properly assess combustion chamber integrity.
Excessive lubricant consumption or power loss also warrants professional evaluation. Multiple leak locations indicate systemic problems beyond DIY fixes.
Conclusion
The troubleshooting steps you’ve learned transform what might seem like a complex mechanical problem into manageable maintenance tasks. You now possess the knowledge to identify common fluid escape issues with confidence.
Regular inspection of your equipment prevents minor issues from becoming major repairs. Always consult your owner’s manual for proper fluid capacity and maintenance schedules. Checking indicator markings helps avoid overfilling that can cause pressure problems.
Addressing concerns early saves significant money on potential engine damage. Most fixes involve affordable components like gaskets and seals. For serious internal damage, professional assessment ensures proper repair.
Your consistent maintenance routine extends the lifespan of your outdoor power equipment. This knowledge empowers you to keep everything running smoothly through every season.
FAQ
What should I check first if my lawn mower is spitting oil?
Begin by checking the oil level. An overfilled crankcase is a common culprit. Also, inspect the air filter for clogs and ensure the engine wasn’t recently tipped on its side, which can cause excess oil to enter the combustion chamber.
Can a dirty air filter cause my mower to leak oil?
Yes. A clogged air filter restricts airflow, creating excess pressure inside the crankcase. This pressure can force oil past seals and gaskets, leading to leaks from the oil fill tube or other engine components.
Why is there oil coming from the exhaust or muffler?
Oil in the exhaust often indicates overfilling or an internal engine problem. Excess oil can burn in the combustion chamber, producing blue smoke. Worn piston rings or a faulty valve guide seal can also allow oil to enter the cylinder and exit through the muffler.
How do I fix a lawn mower that’s leaking oil after I’ve checked the level?
If the oil level is correct, the issue is likely a faulty seal. Inspect the drain plug, oil fill cap seal, and gaskets around the engine block. Replacing a worn seal or tightening a loose drain plug can often solve the problem.
My mower started smoking after I changed the oil. What happened?
This typically means you added too much oil. The excess gets into the combustion chamber and burns, creating smoke. You should drain some oil to reach the proper level on the dipstick. Always check the oil level after a change.
When should I seek professional help for an oil leak?
If you’ve checked the oil level, replaced obvious seals like the one on the oil fill cap, and the leak persists, the problem may be internal. Issues like cracked engine blocks or severely worn piston rings require a professional mechanic’s expertise.