Have you ever wondered why your turf looks ragged and brown after a fresh cut? The culprit is often a dull mower blade tearing the grass instead of slicing it cleanly.
Your lawn mower works hard. Regular contact with grass, soil, and hidden debris slowly wears down its cutting edge. This guide provides a clear path to restoring that sharp edge. You will learn the complete process for safe blade maintenance.
Mastering this skill saves money on professional services and extends your equipment’s life. A keen edge promotes a healthier lawn by making clean cuts. This prevents disease and gives your yard a crisp, professional look. Proper timing is also crucial for lawn health, much like knowing how long to wait to mow after overseeding a fescue.
We cover everything from identifying a dull blade to balancing and reinstalling it. Discover multiple methods to suit your tools and confidence level. This essential maintenance task is straightforward for any homeowner.
Key Takeaways
- A sharp blade cuts grass cleanly, promoting lawn health and a neat appearance.
- Regular blade maintenance saves money on professional sharpening services.
- Proper sharpening extends the overall life of your lawn care equipment.
- Safety is the most critical part of the entire blade sharpening process.
- Balancing the blade after sharpening is essential for a smooth, vibration-free cut.
- You can choose from several sharpening methods based on your available tools.
- This is a manageable DIY task that improves your lawn’s look and vitality.
Understanding the Importance of a Sharp Mower Blade
The quality of your cut directly reflects the condition of your equipment’s most critical component. A keen edge is fundamental for effective lawn care and vitality.
Impact on Lawn Health and Appearance
A sharp mower blade slices grass cleanly. This precise action is vital for the health of your lawn. Torn or ragged edges from a dull tool stress each grass blade.
Clean cuts heal much faster. This allows plants to recover quickly and continue growing strong. Your lawn also becomes more resilient.
It is less vulnerable to disease and pests. A clean cut provides fewer entry points for problems. The overall look of your yard improves dramatically.
Benefits of Clean, Even Cuts
You will notice an immediate difference in uniformity. A sharp edge eliminates uneven or striped patterns. This gives your property a crisp, professional appearance.
The grass maintains its natural green color at the tips. It avoids the brown, damaged look caused by tearing. Furthermore, fine clippings from a good cut return valuable nutrients to the soil.
This natural fertilization strengthens the root system. It promotes denser, more resilient growth over time. Regular maintenance is an investment in your lawn’s long-term beauty and health.
Signs Your Lawn Mower Blade Needs Attention

Learning to recognize the warning signs of a dull cutting tool can prevent damage to your grass. Regular inspection helps you catch issues early before they affect your lawn’s health. This proactive approach saves time and maintains your equipment’s performance.
Your lawn’s condition provides clear feedback about your equipment. After each mowing session, take a moment to examine the results. This simple habit reveals important clues about your blade’s condition.
Visual Cues: Dents, Uneven Grass, and Ragged Edges
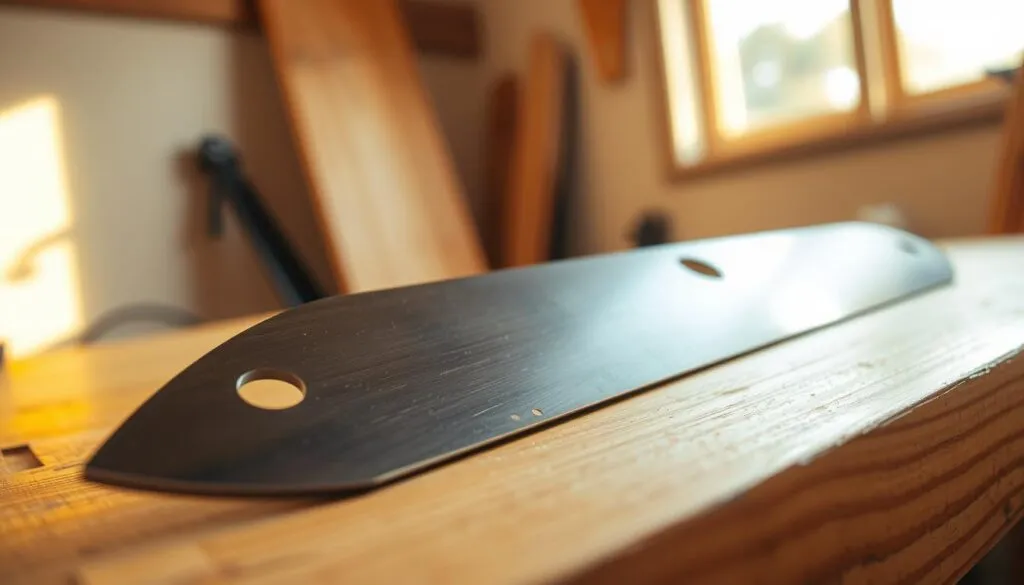
Look for visible damage on the cutting edge of your lawn mower blade. Dents, nicks, or chips often appear after contact with rocks or hard objects. These imperfections compromise the quality of your cut.
Examine your grass tips after mowing. Clean, straight edges indicate a sharp blade. Torn or frayed grass signals that your equipment needs attention. Ragged cuts leave your lawn vulnerable to disease.
Uneven grass height across your yard suggests inconsistent cutting performance. A dull blade may bend grass over rather than slicing it cleanly. This creates an irregular appearance that affects your lawn’s overall look.
Follow a regular maintenance schedule for optimal results. Most experts recommend servicing your blades twice per season. After approximately 25 hours of use, your equipment typically needs attention.
Immediate sharpening becomes necessary if you hit hard objects during mowing. Stones and concrete edges can create significant damage. Addressing these issues promptly ensures consistent cutting quality.
Safety Precautions When Handling Mower Blades
Safety should always be your primary concern when preparing to service any mechanical equipment. Taking the right precautions protects you from potential hazards during maintenance. Proper setup creates a secure environment for effective work.
Establishing a systematic approach prevents accidents before they occur. This foundation ensures your maintenance tasks proceed smoothly and safely.
Proper Personal Protective Equipment
Always wear heavy-duty work gloves when handling cutting components. Leather gloves provide excellent protection against sharp edges. Even dull equipment can cause serious injuries.
Protective eyewear shields your vision from flying debris. Long sleeves create an additional barrier during your work. Ear protection becomes essential when using power tools.
Disconnecting the Power Source
Disconnect the spark plug wire on gas-powered equipment before beginning any work. This prevents accidental engine starts during maintenance. For electric models, remove the battery or unplug the unit completely.
The spark plug wire disconnection is your most critical safety step. It ensures the equipment cannot activate while your hands are near moving parts.
Preparation and Setup for Safe Operation
Drain the gas tank to avoid fuel spills when tipping your equipment. Some experienced users work with oil and gas still in the engine if they position the unit upright afterward.
Organize your tools in a clean, well-lit workspace. Proper preparation minimizes risks and maximizes efficiency. A thoughtful setup makes the entire process safer and more effective.
How to Remove and Clean Your Mower Blade

This phase transitions from preparation to hands-on work with your equipment. Proper execution here sets the stage for effective maintenance.
You will detach and clean the component. A systematic approach ensures safety and accuracy during reinstallation.
Steps to Carefully Remove the Blade
After disconnecting the spark plug wire, carefully tip your lawn mower on its side. Position it so the air filter and carburetor face upward. This prevents fluid leaks.
Before loosening any fasteners, mark the blade’s bottom side. Use a permanent marker or spray paint. This simple step guarantees correct orientation later.
Locate the central nut securing the component to the drive shaft. Your primary tool for this task is a socket wrench. Select the correct socket size for a secure fit.
If the nut resists, do not force it. Brace the blade with a block of wood to prevent rotation. This gives you the needed leverage to loosen the wrench safely.
For stubborn, rusted connections, apply penetrating oil. Allow it to sit for several hours before attempting again. Patience prevents damage to the threads.
Effective Cleaning Techniques to Remove Debris
Once the component is free, clean it thoroughly. Wipe away loose grime with a dry rag or microfiber cloth. This reveals the true condition of the edge.
Heavily soiled lawn mower blades may need more attention. Spray them with a penetrating oil and scrub with a stiff brush. This removes caked-on grass and dirt effectively.
With the blade removed, take the opportunity to clean the mower deck. Use a putty knife to scrape away matted grass clippings. A quick rinse with a garden hose clears remaining debris.
Allow the deck to dry completely before reinstalling the sharpened component. A clean deck promotes better airflow and cutting performance.
| Condition | Recommended Tool | Technique | Result |
|---|---|---|---|
| Light Dust/Debris | Dry Rag or Microfiber Cloth | Wipe surface thoroughly | Quick, basic cleaning |
| Caked-on Grass & Dirt | Stiff Brush & Penetrating Oil | Spray, wait, scrub | Deep cleaning of tough residue |
| Mower Deck Underside | Putty Knife & Garden Hose | Scrape and rinse | Improved airflow and cut quality |
how sharpen mower blade: Step-by-Step Process
Restoring cutting precision involves choosing between traditional hand tools and modern power equipment. Begin by securing the component in a bench vise with the cutting edge facing upward. This stable setup ensures safety and control throughout the restoration process.
Carefully examine the metal surface before beginning work. Look for cracks, severe bends, or missing pieces that indicate replacement is necessary. Minor nicks and dullness respond well to proper edge restoration techniques.
Manual Sharpening Methods with Files and Grinders
For manual restoration, use a 10-inch metal file at approximately a 45-degree angle. Push the tool in one direction along the existing edge, following its natural contour. Apply pressure on forward strokes only, avoiding back-and-forth sawing motions.
Most components require fewer than 50 strokes per side to achieve optimal sharpness. Your goal is a butter knife sharp edge rather than razor-sharp. This gentle edge lasts longer and provides cleaner cuts.
Utilizing Drill Attachments and Power Tools
Power tools accelerate the restoration process significantly. Drill attachments with sharpening stones automatically maintain the correct angle against the component’s edge. Move the powered stone back and forth with medium pressure.
When using an angle grinder with a flap disc, work slowly to prevent overheating the metal. If the edge becomes too hot to touch, pause or cool it in water. Consistent movement ensures even metal removal across the entire cutting surface.
| Method | Best For | Time Required | Skill Level |
|---|---|---|---|
| Hand File | Precise control, minor touch-ups | 15-20 minutes | Beginner |
| Drill Attachment | Consistent angle, faster results | 5-10 minutes | Intermediate |
| Angle Grinder | Heavy wear, experienced users | 3-5 minutes | Advanced |
Always wear protective gloves and eyewear during this maintenance. Work in a well-ventilated area and test sharpness carefully after completing each side. Proper technique extends your equipment’s lifespan and ensures optimal performance.
Check and Maintain Blade Balance for Optimal Mowing
Your equipment’s performance and longevity depend on a principle you can test with a simple tool. Even weight distribution is crucial after you work on the cutting component.
An unbalanced cutting tool creates annoying vibrations. More importantly, it can damage your machine’s internal parts. The bearings and drive shaft suffer from the stress.
Restoring a keen edge can sometimes remove more material from one side. This creates a weight difference. Checking the balance ensures smooth, safe operation.
Techniques to Ensure Even Weight Distribution
You can check the balance with common household items. Insert a screwdriver tip through the center hole. Hold the component horizontally and release it.
A properly balanced blade will remain level. If one side dips, that end is heavier. You must remove a small amount of metal from the heavier side.
For greater precision, a dedicated blade balancer is a wise investment. This cone-shaped tool gives a clear, accurate reading. The process remains the same: identify the heavy side and file it lightly.
Recheck the balance after each adjustment. Continue until the component rests perfectly level. This attention to detail protects your lawn mower and ensures a quality cut.
| Method | Tools Needed | Best For | Precision Level |
|---|---|---|---|
| Screwdriver Test | Long screwdriver | Quick checks, basic confirmation | Good |
| Dedicated Balancer | Blade balancer tool | Accuracy, routine maintenance | Excellent |
| Nail & Wood | Nail, piece of wood | DIY alternative, no special tools | Fair |
Conclusion
With the knowledge you’ve gained, your lawn care routine can now include professional-level blade maintenance. This skill ensures your property maintains its vibrant appearance throughout the entire growing season.
For optimal performance, plan your maintenance around usage patterns. Most equipment requires attention after 20-25 hours of operation. Calculate your specific schedule based on weekly mowing time to determine when you’ll reach this threshold.
Keeping an extra set of blades on hand creates an efficient rotation system. This approach allows you to swap components immediately when needed. You’ll typically service your cutting edges two to three times per season.
The effort you invest in proper equipment care delivers significant returns. Your lawn will thrive with healthier growth and reduced disease susceptibility. Regular maintenance also extends your equipment’s lifespan, saving money over time.
FAQ
Why is a sharp edge on my mower blade so important?
A sharp edge is crucial for your lawn’s health. A dull blade tears grass, leaving ragged edges that turn brown. A clean cut keeps your turf looking vibrant and helps it resist disease.
What are the clear signs that my blade needs sharpening?
Look for visual cues like an uneven lawn surface after mowing. If the tips of the grass are shredded instead of cleanly sliced, it’s time for blade sharpening. Also, inspect the metal for nicks and dents.
What safety steps should I take before starting?
Always disconnect the spark plug wire to prevent accidental starting. Wear sturdy work gloves to protect your hands from the sharp edge. Secure the mower and gather your tools, like a socket wrench, before you begin the process.
How do I properly remove the blade for maintenance?
First, ensure the mower is on a flat surface and the gas tank is empty. Use a block of wood to immobilize the blade, then use a socket wrench to loosen the bolt. Carefully lift the blade away from the deck.
What is the best method for sharpening the blade edge?
You can use a metal file for manual work or a bench grinder for faster results. The key is to follow the original angle of the edge, removing just enough metal to restore a sharp cutting surface. Avoid overheating the metal.
Why is checking the balance of my mower blades necessary?
An unbalanced blade causes excessive vibration, which can damage your mower’s engine and spindle. After sharpening, use a blade balancer to ensure even weight distribution on both sides for smooth operation.